Last week I showed you my "new to me" thrift store chairs. I painted and re-upholstered them, and they came out beautiful. BUT I wasn't done with them! Oh no, I still had a little something in mind to make them even sweeter. This week, I finally finished that project to complete the look of my chairs.

Do you see it? Maybe this will help. Here's a before picture of that same chair.
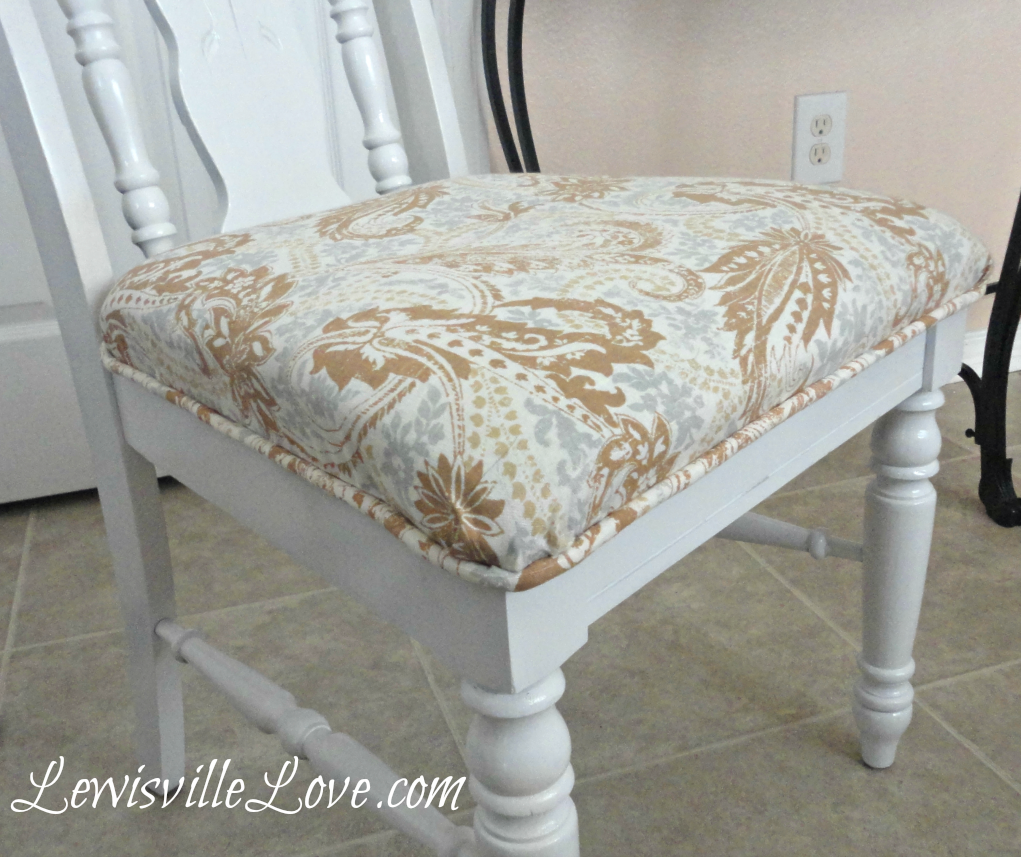
 Now you see it, right? The chairs looked great as is, but adding the piping makes such a big difference. It gives them a finished looked, and now they are truly, officially finished!

Adding the piping was actually really easy to do, and I'm going to show you exactly what I did. This idea and method by the way, is 100% not mine. I got it from the very talented Christy from Confessions of a serial DIYer. I featured her post a few weeks ago on my Tips and Tricks Tuesday, and as soon as I saw it, I knew I just had to do it with these chairs. She talks about a sew and no-sew method. Today, I'll be doing the no-sew method...for three reasons. 1. I don't sew. 2. I don't own a sewing machine. 3. I don't sew! I do however, own a very nifty hot glue gun, and that's all you'll need to add piping to your chairs.
So lets get started, shall we? After measuring around the seat of your chair, cut your material to that length to make a long 2-inch strip.

 Place your rope in the middle of your fabric strip. Hot glue the edges like the picture below to get started.


 Once I got to the end, I re-measured to make sure the piping was long enough. It's that whole measure twice, cut once mentality.

When the piping cord is finished, hot glue it to the back/ bottom of your seat. Be sure to keep the screws that attach your seat to the chair in a place you won't lose them, like a plastic snack bag labeled "screws to chairs". I lost two of mine and still have no idea what I did with them.
 Do you see (above) the piping cord on the left? I hot glued that to the edges of my seat. You can also use a staple gun if you don't feel like burning off your finger tips. Choices. It's all about (no sew) choices here.
 Attach your seat back on with those screws you made sure not to lose and voila! Look at that beautiful piping! Come on now; tell me that does not look amazing! Christy, you're a genius!


 LOVE. LOVE. LOVE.

Do you see it? Maybe this will help. Here's a before picture of that same chair.


Adding the piping was actually really easy to do, and I'm going to show you exactly what I did. This idea and method by the way, is 100% not mine. I got it from the very talented Christy from Confessions of a serial DIYer. I featured her post a few weeks ago on my Tips and Tricks Tuesday, and as soon as I saw it, I knew I just had to do it with these chairs. She talks about a sew and no-sew method. Today, I'll be doing the no-sew method...for three reasons. 1. I don't sew. 2. I don't own a sewing machine. 3. I don't sew! I do however, own a very nifty hot glue gun, and that's all you'll need to add piping to your chairs.
So lets get started, shall we? After measuring around the seat of your chair, cut your material to that length to make a long 2-inch strip.

Next, you'll need some kind of cotton like cord or rope. I looked around my garage and round some left over rope from our last move. Christy used a clothesline from Walmart for her piping.


Fold your material over and hot glue it as closely as you can to the rope.


When the piping cord is finished, hot glue it to the back/ bottom of your seat. Be sure to keep the screws that attach your seat to the chair in a place you won't lose them, like a plastic snack bag labeled "screws to chairs". I lost two of mine and still have no idea what I did with them.


Blessings,
Lisa
Fluster Buster
Posed Perfection
I link all my projects with
some wonderful blogs. To visit them, go to the {Link Party Love} page found at
the top of this page on the {Home} bar.
Also linking to:
Between Naps on the Porch
Savvy Southern Style
No Minimalist Here
The Shabby Creek Cottage
Miss Mustard Seed
Funky Junk Interiors
Coastal Charm
Also linking to:
Between Naps on the Porch
Savvy Southern Style
No Minimalist Here
The Shabby Creek Cottage
Miss Mustard Seed
Funky Junk Interiors
Coastal Charm
Fluster Buster
Posed Perfection
Oh, Wow! That is a fabulous way to do piping! Your chairs came out beautifully. I am glad to be following you!
ReplyDeletePerfection! This really gives the chair that professional, finished look. I would never think you could do this without sewing. :)
ReplyDeleteThanks so much for sharing!
xo
Pat
Looks great! I have a sewing machine, but no zipper foot, so this is a great option.
ReplyDeleteTOTAL genius!! I will now have to follow BOTH of you!! Thank you!! Like you, I don't sew, have no sewing machine, and don't sew... bless you!!!
ReplyDeleteScottieV
Love this project. I am with you on the no sew stuff. My sewing machine had a name which I don't like to repeat because he gave me such a pain..so to get the last word I sold him at a garage sale for 2 bucks. My hot glue gun however, we are besties! LOL
ReplyDeleteSo this project is awesome!
A real neat and NIFTY THRIFTY idea. Thank you for sharing it at my party.
ReplyDeleteBlessings,
Linda
This is really brilliant! I've not ever seen anyone do this before, and I wish I had thought of it before I did all my dining chairs! Looks great!
ReplyDeleteWhat a love chair. Just like have sewn them. Pinning this!
ReplyDeleteThanks for sharing.
Ellya
Wow your before and after are truly inspiring. YES! the piping really adds. What a great idea to use hot-glue...!!
ReplyDelete:)
hugs x, Crystelle
Crystelle Boutique
You did a great job! The chair is gorgeous.
ReplyDeleteThanks for sharing.
Hope to see you on my blog:)
Love love love! Come link up to centerpiece Wednesday and share this post with us.
ReplyDeleteWww.thestylesisters.blogspot.com
Karin
YES! I HATE sewing piping, THANK YOU for a no sew way, I'm going to add piping to everything now! Pinning for reference :)
ReplyDeleteDawn from I Think We Could Be Friends.com stopping by from Coastal Charm :)
I have avoided piping all these years! I hate the cutting on the bias, the stitching close to the piping (which never quite did) and then trying to get it all put together! This is so amazing! Course, it only works if the chair seat comes off and you can glue from the bottom....very awesome! Thanks for sharing.
ReplyDeleteNancy
This looks so pretty. Thanks for the tutorial. Thanks so much for linking to Inspire Me. Hugs, Marty
ReplyDeleteI need to do this to my dining room chairs...never thought to glue the whole thing - thanks for the inspiration - now I just need to find the energy :-)
ReplyDeleteThese look fabulous - it's amazing what a difference the piping makes and I love that you can do it without sewing.
ReplyDeleteI do hope you will share at this week's Empty Your Archive where one of our link up themes is chair makeovers. There's loads of other fun food, craft, decor & parenting themes as well and the idea is to dust off great old posts that would love some new readers. Do hope to see you there - Alice @ Mums Make Lists x
I love this tip!!!! Your chair and piping look fantastic. Just finished a chair refinish, but i think i love this piping and it's a must do. Pinning, g+, and swerving your tip:) I posted scrappy note board this week to Fluster:)
ReplyDeleteThanks for the tip...I have yet to reupholster a chair but I'm getting my nerve up. I'm painting one right now and I must say; it looks great but I question how the fabric will feel when I'm done. :0
ReplyDeleteDenise
Hi Lisa, I just happened to see this on TT&J and wow, I'm so excited to see how fantastic your chairs turned out! The piping is perfection...great job! :)
ReplyDeleteXO,
Christy
Your chair looks so cute! What a great idea with the piping! Thanks for sharing the tip!
ReplyDeletewell that is certainly a great project. Thank you for sharing
ReplyDeleteI am working on some very old chairs, right now! I may have to try this, and see how it looks. They need something to make them POP! However, I do sew, and making piping is no big deal for me. Stapling it on the bottom of the chair seat, like this, has solved a problem, for me, though!
ReplyDeleteSo much informative tutorials..!!!
ReplyDeleteI git different ideas from your blog..Bedroom Furniture Online