I know it's December. I know that everyone is talking about getting their Christmas mantels together and their outdoor Christmas wreaths and lights hung. I know it's a big deal to show off your beautifully decorated Christmas trees this time of year. I know it's Christmas time, and I'm the odd ball talking about my Beach theme bathroom. I know. And just to add further doubts about my Christmas sanity, I'm going to let you know how I put that cute surfboard shelf together. Why not? I'll share all about my Christmas decorating with you soon, but for now, lets head back to the beach!
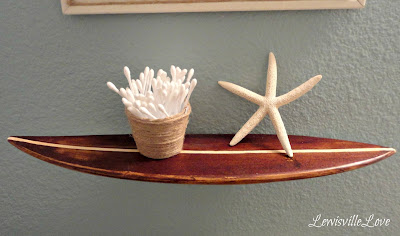 I officially revealed the Beach Bathroom last week, but I didn't get to share about one of my favorite parts in decorating the bathroom. It's this surf board shelf.
I bought this surfboard many months ago at my favorite thrift store for just $4. It was actually a clock and looked like this.
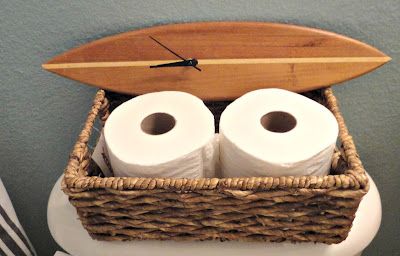
 I think someone with DIY skills made this some time ago. It had alot of scratches on it that don't show up in the pictures, and the clock didn't really work. I really wasn't sure what I wanted to do with it. I just figured it was a surf board and it went with my beach theme. Something was bound to come to mind, right?
Then I saw these beach shelves from Pottery Barn Teen and inspiration came a flowing!
I love them, but at Pottery Barn prices, it wasn't going to happen....unless....I make my surf board a shelf. Yes. Yes. My $4, thrift store clock surf board would just have to be converted into a shelf. I'll call it the Lewisville Barn surf's up shelf. I know. I should be in marketing.
The first thing I did was take apart the clock unit. It left a gaping hole in the middle of the board, but that would be easily fixed. The surf board got a good sanding, both by hand and by using my orbital sander.

Next, I used my wood filler to fill that gaping hole. The board was actually made of beautiful wood, but the varnish on it was really thick. I had to keep sanding it down. And sanding it down....

I sanded a little to much! The original DIYer of this surf board cut a huge round hole in the back for the clock unit. It started showing through the more I sanded.

So I stopped sanding and stained my surfboard, careful not to stain that middle lighter line.

I used Dark Walnut stain from Minwax. I love the dark, rich color.

I always use a sponge brush when I stain, wait about 1-2 minutes, then wipe off the excess with a clean cloth.

I also protected my work on the surf board by brushing on a coat of polyurethane on it and letting it cure for a day.

Finally, it was ready to be hung in the bathroom...or so I thought. I bought these L brackets from ACE hardware for just a few dollars. I confess, I did try to just glue the surf board to the "metal" L brackets.....are you done laughing, now? Wood glue does not work on metal, just in case you were wondering.

So I went back to the garage to find a piece of wood that I could screw into the L brackets. I still had a little wood left over from the box that I made my Beach Sign with the week before. Of course, I had to cut it down to fit the surf board. Again, a hand saw works, but it sure would be nice to have a power hand tool...oh hey, and Christmas is right around the corner! Wow, funny how that works out with timing...maybe.

So there it is, wood screwed into the L brackets. This is already taking longer than I wanted it too.

Now, I can add the wood glue...ahem, and the surf board on top of that.

And it fits securely on my home made, jimmy all girl style, L brackets! And it looks good!


By the way, I like my surf board shelf more than the above mentioned store.

I bought this surfboard many months ago at my favorite thrift store for just $4. It was actually a clock and looked like this.


Then I saw these beach shelves from Pottery Barn Teen and inspiration came a flowing!
 |
| PB Teen |
I love them, but at Pottery Barn prices, it wasn't going to happen....unless....I make my surf board a shelf. Yes. Yes. My $4, thrift store clock surf board would just have to be converted into a shelf. I'll call it the Lewisville Barn surf's up shelf. I know. I should be in marketing.
The first thing I did was take apart the clock unit. It left a gaping hole in the middle of the board, but that would be easily fixed. The surf board got a good sanding, both by hand and by using my orbital sander.

Next, I used my wood filler to fill that gaping hole. The board was actually made of beautiful wood, but the varnish on it was really thick. I had to keep sanding it down. And sanding it down....

I sanded a little to much! The original DIYer of this surf board cut a huge round hole in the back for the clock unit. It started showing through the more I sanded.

So I stopped sanding and stained my surfboard, careful not to stain that middle lighter line.

I used Dark Walnut stain from Minwax. I love the dark, rich color.

I always use a sponge brush when I stain, wait about 1-2 minutes, then wipe off the excess with a clean cloth.

I also protected my work on the surf board by brushing on a coat of polyurethane on it and letting it cure for a day.

Finally, it was ready to be hung in the bathroom...or so I thought. I bought these L brackets from ACE hardware for just a few dollars. I confess, I did try to just glue the surf board to the "metal" L brackets.....are you done laughing, now? Wood glue does not work on metal, just in case you were wondering.

So I went back to the garage to find a piece of wood that I could screw into the L brackets. I still had a little wood left over from the box that I made my Beach Sign with the week before. Of course, I had to cut it down to fit the surf board. Again, a hand saw works, but it sure would be nice to have a power hand tool...oh hey, and Christmas is right around the corner! Wow, funny how that works out with timing...maybe.

So there it is, wood screwed into the L brackets. This is already taking longer than I wanted it too.


And it fits securely on my home made, jimmy all girl style, L brackets! And it looks good!


Blessings,
Lisa
I link all my projects with some wonderful blogs. To visit them, go to
the {Link Party Love} page found at the top of this page on the {Home}
bar.
Also linking to:
Between Naps on the Porch
Savvy Southern Style
No Minimalist Here
The Shabby Creek Cottage
Saved by Love Creations
Miss Mustard Seed
Funky Junk Interiors
Coastal Charm
Restore Interiors
Tip Junkie
Also linking to:
Between Naps on the Porch
Savvy Southern Style
No Minimalist Here
The Shabby Creek Cottage
Saved by Love Creations
Miss Mustard Seed
Funky Junk Interiors
Coastal Charm
Restore Interiors
Tip Junkie
Love it! I would love you to come join my Pin Me Linky Party that starts Friday morning at 8am CST.
ReplyDeletegenius! it looks way better stained and as a shelf. so glad you saw that inspiration and reworked it!
ReplyDeleteThanks for sharing this wonderful idea at Simple & Sweet Fridays. What great ways to display with a beach theme! Have a wonderful week!
ReplyDeleteJody
Looks so great, I'm glad it didn't sand right through! I love the dark stain, looks kind of retro and awesome.
ReplyDeleteLove your surfboard! & your Beach sign. Fabulous!
ReplyDeleteI am impressed! Yes, my husband would have laughed at me trying to do all that and would have ended up having to do it. I love the beachy look and attempt it in the summer here in coastal Maine. Great project. Lisa..found you through Trash 2 Treasure.
ReplyDeleteWhat a clever idea and great execution. I love the way it turned out.
ReplyDeleteI love your surfboard shelf! Great DIY project! And I like yours better than the PB version too :)
ReplyDeleteNice creativity. :) It's definitely going to spice up the ambiance. Having a surf board shelf for a beach bathroom not only is a design in its own element but it's quite creative. Your imagination is just wonderful. thanks for the share!
ReplyDelete