I know it seems like all I'm doing is painting these days, but there's a reason for that. Since I live in the Mile High area, I can't usually paint during the cold winters. Warmer weathers means it's time to get those paint projects all done. And so, that's just what I'm doing- painting to my heart's content!
Today, I'm going to show you how I painted a set of '80s brass lamps from the thrift store, but first, let me just show you how great they turned out!
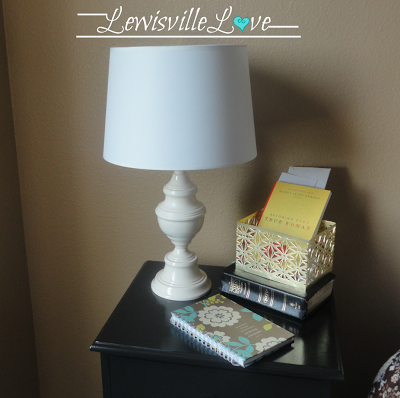
 Would you ever guess this was an old lamp? I think it looks just as good as anything you'd find in a number of stores. This is what they looked like before.... brace yourself.

Are we back in the '80s yet? They're pretty "Rad," right? I know gold is making a comeback, but these were just the wrong shade of gold. Pretty, yes-in a way, but I needed lamps that would brighten up my space a bit more. My room is dark, so these $5 lamps were going to be painted white.
 I cleaned them up really good, making sure there wasn't a bit of dust left on them. Then I taped off the tops and cords and used a spray primer.
 I LOVE spray paint projects. They're so easy and super quick, but still, I find myself impatiently waiting for the paint to dry. It takes a whopping 20 minutes to dry! Hurry, hurry, hurry!

Next, I spray painted the lamps with my favorite white called heirloom white from Rust-0leum
 I've spray painted lamps before, and this is usually where I've stopped the project, incorrectly thinking it was complete. Last year, I sprayed a lamp for my son's room, but it started getting dull and chipping after a while. I've learned since then, spray painted lamps like this must be protected.

This CLEAR coat not only protects the paint, but it makes it shine like a brand new lamp. LOVE!

Primered- Spray Painted- Protected
 And the room is on it's way to a "brighter" future.
 The lamp shade, by the way, will also be getting a make over.

And, yes, my $5 lamps do work. Love, Love, Love!

Today, I'm going to show you how I painted a set of '80s brass lamps from the thrift store, but first, let me just show you how great they turned out!


Are we back in the '80s yet? They're pretty "Rad," right? I know gold is making a comeback, but these were just the wrong shade of gold. Pretty, yes-in a way, but I needed lamps that would brighten up my space a bit more. My room is dark, so these $5 lamps were going to be painted white.


Next, I spray painted the lamps with my favorite white called heirloom white from Rust-0leum


Primered- Spray Painted- Protected


And, yes, my $5 lamps do work. Love, Love, Love!

Blessings,
Lisa
Fluster Buste
I link all my projects with some wonderful blogs. To visit them, go to
the {Link Party Love} page found at the top of this page on the {Home}
bar.
Also linking to:
Between Naps on the Porch
Savvy Southern Style
No Minimalist Here
The Shabby Creek Cottage
Miss Mustard Seed
Funky Junk Interiors
Coastal Charm
Also linking to:
Between Naps on the Porch
Savvy Southern Style
No Minimalist Here
The Shabby Creek Cottage
Miss Mustard Seed
Funky Junk Interiors
Coastal Charm
Fluster Buste
Great tip about the clear cover. I have bad habit of only painting then wonder why the paint gets chippy or tarnished. Must get some of that. shucks I was at True Value grand opening today, could/should have gotten some of that clear cover stuff. Bought an awesome shelf at thrift store today for $5, going to spray paint it but then will spray on some of that great cover paint. Was meant for me to see this post tonight. Wish I'd seen it earlier to get 20% off. Ah well, things happen for a reason. Another time. It's hard for us to spray paint as it's always super windy where we live, (west of Grand Junction). Hardly a day that doesn't blow like crazy. Have a great July 4th.
ReplyDeletethose came out so beautiful!
ReplyDeleteThanks, Hil. I love them!
Deleteyou got a real bargain on those lamps and they turned out lovely. Makes me wish I'd hit a few garage sales last weekend!
ReplyDeleteThe great thing about garage sales is that they happen every weekend! There's always a deal to be found!
DeleteYour lamps look awesome!! I love seeing a good spray painted transformation!
ReplyDeleteSelene @ Restoration Beauty
Thanks, Selena. I love how fast a project can be transformed with spray paint!
DeleteI love these Lamps!! I would love for you to come link up to my Paint Party Starting Tomorrow after 6pm!! Startathome.blogspot.com
ReplyDeleteHope to see you there,
Brooke
The lamp looks great!! It seems like I'm always spray painting a lamp! Jenna @ Rain on a Tin Roof
ReplyDeleteThis looks great! I appreciate your tips, I've got a few lamps that I've been meaning to re-do...this is good motivation to get them done sooner! I featured this on my blog today, if you'd like to stop by! http://www.unoriginalmom.com/original-fridays-15/
ReplyDeleteThanks you, Meredith! I really appreciate the feature. Love your blog; we're all unoriginalmoms in truth!
DeleteBlessings,
Lisa
Nice update!Now they have such modern appeal. Love the transformation.
ReplyDeleteThanks, Joselyn. I love the update too!
DeleteVery nice!! Great job and they look very modern and chic. Please stop by and link up this great post at http://www.mypersonalaccent.com/the-peacock-strut-1/ as we launch our first Blog Strut, Peacock Style.
ReplyDelete