#Let'sDoThis! #USAsoccer
As I'm putting this post together, my eyes are on the TV watching USA vs. Germany in the world cup. My fingers are clicking away on the keypad, but my eyes are fixed on that little ball going back and forth. I'm not a big fan of soccer, but I love sports and this world cup thing is addictive. GOOOOAL!
 |
| Labels and picture made on Picmonkey. |
So remember these? I've been getting many emails about how to make these labels from my up cycled Pantry. I make all my labels and blog designs using Picmonkey. It's a free site that allows me to edit my pictures, design my facebook cover, and make labels. There's so much you can do with Picmonkey. Go on over to their site and check out all they have for you!
Today, We'll review how to make labels for any household need.
GO USA!
 |
| This graphic designed on Picmonkey |
There have been many times when I wanted to organize but fell short of buying labels because even those few dollars just weren't in the budget. So I decided to learn how to make my own, and I'm so glad I did. And now, I get to share that with you all, my lovely readers!
I have lots of pictures for you to follow along so you can make your own labels. Hopefully, you'll understand everything I'm saying in this post, but if not, drop me an email.
Go to Picmonkey.com to make your white starter template and click on edit photo.


I chose a picture of a dresser that I'm working on but haven't posted about the project yet. I'm not getting rid of the picture-just making a starter template with it.

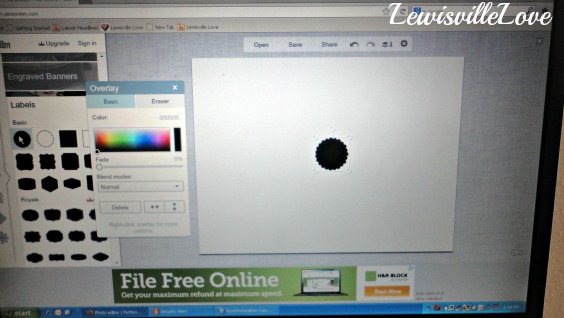
On the left, go down and click the OVERLAYS icon.


Then hit save again on the lower left side to save the new white starter template to your computer.

It will ask if you want to replace the existing picture. No, you do not want to replace it, otherwise you will loose your original picture. So rename the new white starter. Here, I renamed mine "white template". Original, I know!

Now, you can go to picmonkey any time and work on labels to your heart's delight.
To start making those labels right away, click on the OVERLAYS Icon again and scroll down until you see LABELS. Picmonkey also has Victorian labels and Grunge labels to choose from.

Picmonkey has many free editing features everyone can use. That is why I LOVE them. The basic labels are free and you can choose any of them. The Royale features (the crown icon is next to all the royale features) require that you pay for membership. At just $5 a month, it's still a great deal.

I chose the first basic (and free) label.

Just click on it and it will show up on your white template.
Resize it and change it to any color you want it to be. I'm going with blue(ish).

To make more than one label, right click on the image and click on "DUPLICATE OVERLAY"


Resize it, change the color, and place it on top of the first label (in this case the blue label).

I changed the color to white. Now duplicate the white label to place on the second blue label.


For the finishing product, click on the text icon (the big P) to add text to your label. Choose a font you like but remember, only the ones without a crown next to them are free.

Add your text, change the size, change colors if you want, etc. This is the Lobster Two font, one of my new favorites.

Click Save right above your photo, then you can save it to your computer in a file of your choice. To make more labels to save, delete your text, add new text like Twin Sheets, King Sheets, and save those new labels. Delete your text again and add Towels, Beach Towels to the labels and save. You can delete and add text as many times as you like, but once you close Picmonkey, you'll have to start over with your blank labels or the white starter template.

To print, I use Publisher on my P.C. since I don't have ipages for my Mac. Just start a new page, select your picture from file, and click on your blank page to view your photos. Choose your picture (label) and resize it. Here I added the label I made on Picmonkey today and two sets of blank labels.

You can always add your own font to the labels using these programs too.

I know it sounds like a lot to do, but once you get the hang of label making, it's really fast and easy...and addicting. As I make more labels for my organizing projects, I'll make sure to make them available to all my LOVELY readers, free of course. Picmonkey is really easy to use for your own custom designs though. I suggest you go on there and play around with their features. Hope you found some inspiration today. Have fun making labels.
Blessings,
Lisa
Great post - thanks, I learned a lot.
ReplyDelete