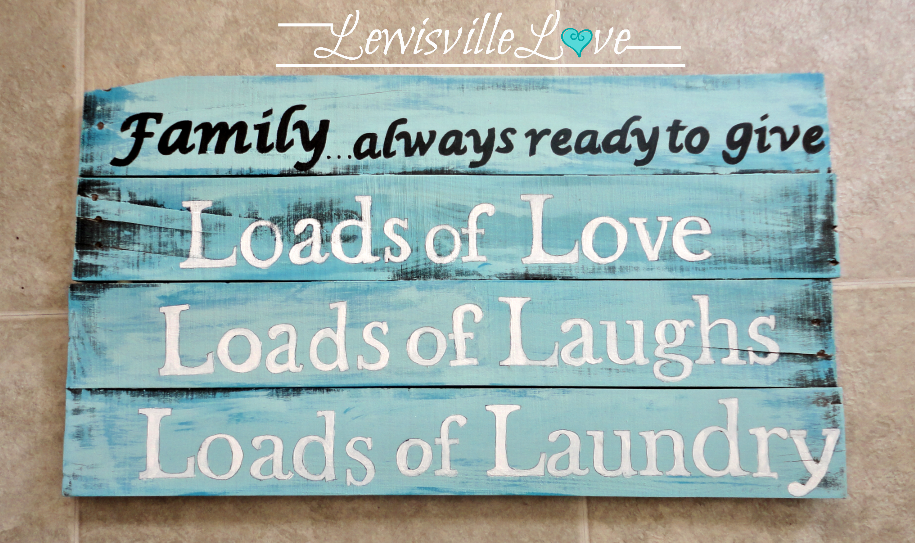
Hi there, all. I'm happy to say we are still enjoying some beautiful weather here in Colorado, but rumor has it it's going to get cold again on Wednesday. Let's hope the rumor is wrong. Today, I'll be sharing about my laundry room sign and how I made it. Now, I really like my laundry sign, but making it took some time and effort. Here's the end result.

It turned out much better than I hoped, and I like the rustic look with the bright blue colors. The laundry room is painted peach (didn't choose the color-just renting) so I wanted something to stand out. I think it works! We are on our way to a laundry room makeover!

The sign was made out of pallet wood. Here's what the sign looked like in the beginning. Big difference, right?

I saved the pallet from the dumpster, brought her home, broke her apart, sanded, then finally cut the pieces down. Sound like a lot? It was. I just wrote a post discussing the TRUTH in using pallet wood for DIY projects. If you missed my synopsis, you can read it HERE.

I built a shelf in my laundry room and stained the wood in a rich walnut by minwax. I did the same here for my sign just to give it that same rustic look as the shelf. I wanted the rich color to just peek through behind my paint.

Now to add color over the stain. I had this blue I picked up on a free paint weekend at Ace Hardware. I wasn't to crazy about it though, so I mixed it with a navy blue that has been sitting in my garage for years- never opened it until now.

I painted with the light blue first, then mixed the colors and painted over the first coat.
 I layered another coat of the lighter blue and my rustic blue sign was on it's way. I used a sponge brush and just used long strokes. There's really no getting it wrong here. It has a beachy look think.

Now for the fun part. I don't have a cricut or silhouette machine. I've always made my signs using my computer and a pen. To see how I use that method, you can read about it HERE. For this sign, I had to get creative. Pallet wood is raw, meaning it's not treated. With treated wood, you can push down hard with a pen/pencil and trace the letters onto the wood. You're left with an indentation on the wood which gives you a great template. Not so with pallet wood.

Instead, I traced my letters with a Sharpie marker. The ink seeps through the paper and you see the outline of each letter. Now we have ourselves a sign in the making. I think I'll be doing this method from now on. Pushing down hard with a pencil to trace each letter can be quite the tricep workout. This was much easier.
 Next, I painted ever so carefully. My white paint covered the sharpie marker by the way, but I still outlined each letter with a regular black pen just so they would stand out a bit.

At first, I just wrote my first quote in the sharpie marker, but I wrote it too small for the overall sign. I decided to start over. How do you take off sharpie marker? Use rubbing alcohol.

I quickly painted that plank again, but I didn't have to start from scratch.
Back to my computer to print my quote. If you do this, you might have to play around a few times with the font size. I find my font sizes are always between 120-200 depending on the sign.

I used the sharpie method again and painted the first quote in black. The final results were well received by the Lewisville munchkins! They seem to like these little projects of mine.
 The sign itself was a budget saver. I had all the materials in my garage, and the wood was free since I delved down into the world of pallet wood rescue.

The laundry room is coming along. It is coming along indeed.


The sign was made out of pallet wood. Here's what the sign looked like in the beginning. Big difference, right?
I saved the pallet from the dumpster, brought her home, broke her apart, sanded, then finally cut the pieces down. Sound like a lot? It was. I just wrote a post discussing the TRUTH in using pallet wood for DIY projects. If you missed my synopsis, you can read it HERE.

I built a shelf in my laundry room and stained the wood in a rich walnut by minwax. I did the same here for my sign just to give it that same rustic look as the shelf. I wanted the rich color to just peek through behind my paint.

Now to add color over the stain. I had this blue I picked up on a free paint weekend at Ace Hardware. I wasn't to crazy about it though, so I mixed it with a navy blue that has been sitting in my garage for years- never opened it until now.

I painted with the light blue first, then mixed the colors and painted over the first coat.


Now for the fun part. I don't have a cricut or silhouette machine. I've always made my signs using my computer and a pen. To see how I use that method, you can read about it HERE. For this sign, I had to get creative. Pallet wood is raw, meaning it's not treated. With treated wood, you can push down hard with a pen/pencil and trace the letters onto the wood. You're left with an indentation on the wood which gives you a great template. Not so with pallet wood.

Instead, I traced my letters with a Sharpie marker. The ink seeps through the paper and you see the outline of each letter. Now we have ourselves a sign in the making. I think I'll be doing this method from now on. Pushing down hard with a pencil to trace each letter can be quite the tricep workout. This was much easier.


At first, I just wrote my first quote in the sharpie marker, but I wrote it too small for the overall sign. I decided to start over. How do you take off sharpie marker? Use rubbing alcohol.

I quickly painted that plank again, but I didn't have to start from scratch.
Back to my computer to print my quote. If you do this, you might have to play around a few times with the font size. I find my font sizes are always between 120-200 depending on the sign.

I used the sharpie method again and painted the first quote in black. The final results were well received by the Lewisville munchkins! They seem to like these little projects of mine.

The laundry room is coming along. It is coming along indeed.

Blessings,
Lisa
I link all my projects with some wonderful blogs. To visit them, go to
the {Link Party Love} page found at the top of this page on the {Home}
bar.
Also linking to:
Between Naps on the Porch
Savvy Southern Style
No Minimalist Here
The Shabby Creek Cottage
Miss Mustard Seed
Funky Junk Interiors
Coastal Charm
Also linking to:
Between Naps on the Porch
Savvy Southern Style
No Minimalist Here
The Shabby Creek Cottage
Miss Mustard Seed
Funky Junk Interiors
Coastal Charm
This is very nice! I really like the saying, and the materials that you used. I didn't know that Sharpie would come off with alcohol! Great tip.
ReplyDeleteEmily
A Tossed Salad Life
The sign looks great! I love the streaky in the blue with the stain coming through. I haven't tried to trace with a sharpie to make an outline before, but I have colored over the back of my paper with a lead pencil and then traced the letters to make a "copy" on the wood/paper. It works pretty well, too, as long as the background isn't too dark to see the pencil. I'll have to remember the sharpie trick!
ReplyDeletejust great idea!!!
ReplyDeleteSo very cute! Love the tutorial. Stopping by from the PoPP.
ReplyDeleteI love this.. The blue is really pretty too. We will be remaking our laundry room this summer and have been looking around for a sign idea to hang there. I think I might be using this.. Thanks so much for sharing it and I look forward to browsing your blog some more.. Saw you on the One Project at a Time blog..
ReplyDeleteTONS of laundry on this end...TONS...but I love the pitter patter and lots of laughter in the house over complete nonsense...like what happened at the second grade cafeteria table today in school!
ReplyDeleteYour laundry room sign is so pretty! I have a new weekly link party which is live now and I would love if you stop by and link up this wonderful post! Hope to see you there! http://mariaelenasdecor.blogspot.com/ Hugs, Maria
ReplyDeleteThis is the cutest sign, how fun. I love it. I would also love for you to link this to my Inspire Me party that is ongoing.
ReplyDeletehttp://www.astrollthrulife.net/2013/04/162nd-inspire-me-tuesday.html
Hugs, Marty
Love this!! Great project, it turned out fabulously and looks perfect in your laundry room. We just redid our laundry room, would love to have added a sign like this... maybe I will have to try:)
ReplyDeleteKrista
This is a great project - I love the colors you chose! Thank you so much for Linking up to Fluster's Creative Muster Party!
ReplyDeleteRobin
Fluster Buster
Love your sign! Just one thing. . . you forgot an important line . . . Loads of Work!
ReplyDeleteI really like how it looks, especially the blue against the peach! Stopping by from Funky Junk Interiors Party Junk 185...
ReplyDeleteCher @ Designs by Studio C
http://designsbystudioc.com
I love this!
ReplyDeleteI would love for you to share this and link up to my TGIF Link Party! Who knows, you just might be featured next week!
http://apeekintomyparadise.blogspot.com/2013/05/a-peek-into-my-paradise-tgif-link-party.html
Cathy
Oh man, I need this for my laundry room! I'm hosting a new linky party at http://hickorytrailblog.blogspot.com/2013/05/efforts-and-assets-linky-party-1.html
ReplyDeleteI would love to have you!
Angela
I love your sign and what a great tutorial. I'll be making a sign for something to try it out. Not laundry as our laundry is tucked into a closet like at one side of our mud room. What can I say it's a single wide mfg. home. But it's ours so I'm learning to love it anyway.
ReplyDeleteOH my heavens, it's rare to find a blogger that doesn't have the cricut or a
Cameo or other fancy machine. I too do not have one of those and for what they cost I don't think I ever will. Can think of lots of other things I want for that kind of cash, like a new couch that I love. I'm digitally challenged anyway so why waste the money.
I've been wanting to try to make a sign the way you did but have been holding off. When I try other methods I end up wanting to throw the whole thing out the back door, really literally. So thank heavens I found this post so now I can try it. Great to know about the sharpie. Those I can afford. You did such a great job on your sign. Thanks for the exceptional inspiration. Happy Weekend.