The laundry room shelf is done, and I'm ready to show you the completed project. In all, it took a few days but that's only because I allowed 24 hours in between the staining and curing process. What's even better is that I spent less than $10 on the shelf, and that was a few months ago when I bought the materials for another project. I LOVE the results and even the family is raving about how great it looks. The wood is beautifully stained and looks stunning in the room. Never thought I'd use the words stunning and laundry together!

The laundry room had one long shelf in it before I added this one. I was filling up that shelf and it was getting quite cluttered. It was also to high for the kids, so another shelf in this room was especially needed.

The standard wire shelves for closets were to long for this space and I don't really care for those anyway, so adding one wasn't an option for me. I had this 6ft + piece of wood from another "well intentioned" project that never happened. I think it's better suited here. LOVE!

Here was the problem.

After measuring and cutting down the wood with my new favorite handtool
 I put it in place and the project was on its way!

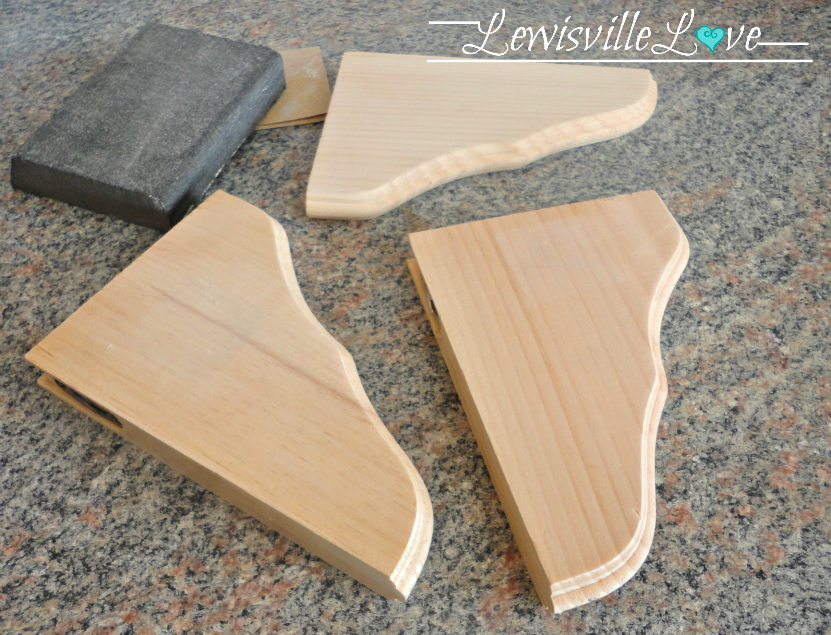
First, on the few warm days we had this week, I took the wood outside and sanded it down. It was already pretty smooth but I wanted to make sure we could run our hands on the surface without fear of splinters.

Use a tack cloth after sanding if you have them. They are a DIY necessity. Tack cloths pick up all the sanding dust from the wood. You can't paint or stain bare wood after sanding unless you clean up the dust. If you don't have one, a wet cloth will work too.

I stained the wood in dark walnut from Minwax with a sponge brush. You brush on a coat then wipe with a clean cloth to lighten up the stain. You can add more coats of stain to darken it to your liking.

Both sides were stained and I let it dry for 24 hours.

The corbels also got a coat of stain.

After waiting 24 hours, I was ready to add poly to the wood to protect the piece, except that the poly was not going to cooperate with me that day. It had gelled in the cold garage.

Just as I was about to grab my polycrylic, I found I had wipe-on Polyurethane! I love it when I find something I need that I completely forgot I had! BTW- I try to save polycrylic to protect my white paint projects only. Polyurethane and Polycrylic are different. "Crylic" is for white or light paint and won't "yellow" your project; but it can also be used to protect dark (stained) projects.
Wipe-on poly (which would yellow my white paint projects) is really easy to use. Just pour some poly on your cloth (or piece of wood) and wipe it into your piece with a clean cloth. I used an old, clean sock.

Wait 24 hours after adding poly then sand down the piece with fine grit sandpaper. I used 220 grit. The higher the number, the finer the sandpaper.

After sanding, clean and wipe with a tack cloth again. Then add another coat of your protectent (poly). You should use at least two coats of poly for your projects to protect them. Just be sure to sand in between coats.
After 24 hours (again) of my last coat of poly, I was ready to put it all together. The corbels were not ready though. I had to move the hardware so the longer side would hold the shelf.

Finally, I taped off the wall to show me where to add the screws to hold the corbels. Everything would sit just above the water line, perfectly hiding it altogether.

The middle is found after careful measuring and the screws were added in. I did use my power drill here.

The corbels fit in there perfectly.

Excitement is growing.....

And then the shelf is added. In most cases, I would use wood glue to adhere the shelf to the corbels. I may still do that, but since we rent this house and most likely will be leaving in the next year, I want the option to take my project with me.

It's the perfect addition to the laundry room.

 I'm not sure how long it will take me to complete the laundry room, but so far I'm LOVING the changes!
I also Love the fact that I did this project completely on my own. If you're thinking about adding shelves but you don't have a way to cut wood at home, you can always measure your space and have your piece cut at Home Depot or Lowes for free. Love that about them.
If I can do this, You can do this! Hope you found some inspiration here today.

The laundry room had one long shelf in it before I added this one. I was filling up that shelf and it was getting quite cluttered. It was also to high for the kids, so another shelf in this room was especially needed.

The standard wire shelves for closets were to long for this space and I don't really care for those anyway, so adding one wasn't an option for me. I had this 6ft + piece of wood from another "well intentioned" project that never happened. I think it's better suited here. LOVE!

Here was the problem.


First, on the few warm days we had this week, I took the wood outside and sanded it down. It was already pretty smooth but I wanted to make sure we could run our hands on the surface without fear of splinters.

Use a tack cloth after sanding if you have them. They are a DIY necessity. Tack cloths pick up all the sanding dust from the wood. You can't paint or stain bare wood after sanding unless you clean up the dust. If you don't have one, a wet cloth will work too.

I stained the wood in dark walnut from Minwax with a sponge brush. You brush on a coat then wipe with a clean cloth to lighten up the stain. You can add more coats of stain to darken it to your liking.


The corbels also got a coat of stain.
After waiting 24 hours, I was ready to add poly to the wood to protect the piece, except that the poly was not going to cooperate with me that day. It had gelled in the cold garage.

Just as I was about to grab my polycrylic, I found I had wipe-on Polyurethane! I love it when I find something I need that I completely forgot I had! BTW- I try to save polycrylic to protect my white paint projects only. Polyurethane and Polycrylic are different. "Crylic" is for white or light paint and won't "yellow" your project; but it can also be used to protect dark (stained) projects.
Wipe-on poly (which would yellow my white paint projects) is really easy to use. Just pour some poly on your cloth (or piece of wood) and wipe it into your piece with a clean cloth. I used an old, clean sock.

Wait 24 hours after adding poly then sand down the piece with fine grit sandpaper. I used 220 grit. The higher the number, the finer the sandpaper.

After sanding, clean and wipe with a tack cloth again. Then add another coat of your protectent (poly). You should use at least two coats of poly for your projects to protect them. Just be sure to sand in between coats.

Finally, I taped off the wall to show me where to add the screws to hold the corbels. Everything would sit just above the water line, perfectly hiding it altogether.

The middle is found after careful measuring and the screws were added in. I did use my power drill here.

The corbels fit in there perfectly.

Excitement is growing.....

And then the shelf is added. In most cases, I would use wood glue to adhere the shelf to the corbels. I may still do that, but since we rent this house and most likely will be leaving in the next year, I want the option to take my project with me.

It's the perfect addition to the laundry room.


I also Love the fact that I did this project completely on my own. If you're thinking about adding shelves but you don't have a way to cut wood at home, you can always measure your space and have your piece cut at Home Depot or Lowes for free. Love that about them.
If I can do this, You can do this! Hope you found some inspiration here today.
Blessings,
Lisa
I link all my projects with some wonderful blogs. To visit them, go to
the {Link Party Love} page found at the top of this page on the {Home}
bar.
Also linking to:
Between Naps on the Porch
Savvy Southern Style
No Minimalist Here
The Shabby Creek Cottage
Miss Mustard Seed
Funky Junk Interiors
Coastal Charm
Also linking to:
Between Naps on the Porch
Savvy Southern Style
No Minimalist Here
The Shabby Creek Cottage
Miss Mustard Seed
Funky Junk Interiors
Coastal Charm
I love your laundry room! The shelf is fantastic!
ReplyDeleteLooks great!! I need to do this! Thanks for the tutorial.
ReplyDeleteTake Care,
Mandy Jean
www.mandyjeanchic.com
Love the shade of stain you picked. Turned out great!
ReplyDeleteI have plans to do the same thing. Love how yours turned out!
ReplyDeleteLooks great! And way to do it all by yourself! I would very much need my hubby's help! :) I can do crafty, but I'm sure I'd need a bit of guidance! Nice job!
ReplyDeleteLooks great! I love the dark stain color you used!
ReplyDeleteSelene @ Restoration Beauty
Your laundry room shelf turned out very pretty Lisa!
ReplyDeleteNice job!
Happy Easter Coming soon and it's always great to see creative minds at work.
:)
Visiting from Transformation Thur @ The Shabby Creek Cottage linky party
Smiles,
Suz @MaytagNMom
NW Illinois
CURRENT PROJECT OF MINE AT LINKY PARTIES
Looking very good! Love that shelf!
ReplyDeleteThanks for linking up this week!
Stacey of Embracing Change
Looks great. I love the dark wood stain, it makes the room feel warm. I added a shelf in our laundry room too but just painted it white.
ReplyDeleteWhat was the depth and thickness of the board you used? Also, what was it made of, i.e southern yellow pine, etc.
ReplyDeleteI bought the board at Home Depot. I think it was a 7ft X 1ft, but I did have to cut it down to fit in my laundry room. I'm pretty sure it was pine. There are many to choose from, and they're really helpful/knowledgeable if you need help.
Delete