I am on a mission. Last time I told you all about my lack of love towards the kids' bathroom. That poor little room has been neglected for far too long. But it is a new day in Lewisville, and our plain jane bathroom is getting a beach themed makeover! Surf's up!
 The FREE quart of paint Ace Hardware gave away a few weeks ago was just what I needed for a little inspiration regarding this plain bathroom. I decided to go with a paint color called "Venice Beach" to go with our "about to become" beach bathroom.
 I wanted a bluish/grey color but "Venice Beach" actually has some green hue to it. It looks great and my mission to complete it in a week (we'll see how that goes?) is in full force.
Today, though I want to talk about one of the more difficult parts about painting a bathroom. No it's not choosing a color or even taping off all the areas you want to protect from paint. For me, the hardest part about painting a bathroom is Painting Behind the Toilet.

Allison from House of Hepworths gave a great tutorial a few weeks ago on protecting your toilet while painting. Brilliantly, she told us to remove the tank lid and place a trash bag over the tank. Super smart right? How many times have I painted this area so slowly with lid and tank fully exposed? Too many!
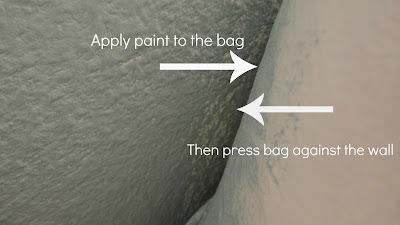
My tank, however, is very tight to the wall. I can not fit a roller of any size behind there, much less paint with a brush. I know no one would ever look behind there (maybe) but the white wall with new blue paint really seeped through. I had to figure out a way to get behind there, just enough so it didn't look like an amateur paint job. So this is what I came up with.
 You can't really see it because of the glare, but I decided to pull the bag up and brush the blue paint onto the bag. Replace the trash bag over the lid.


Today, though I want to talk about one of the more difficult parts about painting a bathroom. No it's not choosing a color or even taping off all the areas you want to protect from paint. For me, the hardest part about painting a bathroom is Painting Behind the Toilet.

My tank, however, is very tight to the wall. I can not fit a roller of any size behind there, much less paint with a brush. I know no one would ever look behind there (maybe) but the white wall with new blue paint really seeped through. I had to figure out a way to get behind there, just enough so it didn't look like an amateur paint job. So this is what I came up with.


Then put you hand in the bag and press it against the wall. Think of sponge painting but with a plastic trash bag.

That's it. The paint from the trash bag rubs off onto the wall, even in the tightest spaces. Easy. Done!
Have a great weekend everyone. Come back on Tuesday for all new Tips and Tricks!
Blessings,
Lisa
I link all my projects with some wonderful blogs. To visit them, go to
the {Link Party Love} page found at the top of this page on the {Home}
bar.
Also linking to:
Between Naps on the Porch
Savvy Southern Style
No Minimalist Here
The Shabby Creek Cottage
Saved by Love Creations
Miss Mustard Seed
Funky Junk Interiors
Coastal Charm
Restore Interiors
Tip Junk
Also linking to:
Between Naps on the Porch
Savvy Southern Style
No Minimalist Here
The Shabby Creek Cottage
Saved by Love Creations
Miss Mustard Seed
Funky Junk Interiors
Coastal Charm
Restore Interiors
Tip Junk
You might also like:
You are too clever! Thankfully, our toilet is lined up with a tile wall and the only portion that needs to be painted is halfway up the wall. Either way, thanks for sharing. I may get to use this trick someday.
ReplyDeletesmart idea~!
ReplyDeleteThanks, that is a neat idea!
ReplyDeleteI will totally use this idea! Thanks!
ReplyDeleteBrilliant! I hope it's okay that I pinned it on Pinterest!
ReplyDeleteI always wonder why people just don't shut off the water and keep flushing until the tank is mostly empty and then remove the tank? Its not that hard to do. Just be careful not to tighten the bolts too much because you'll crack your porcelain.
ReplyDeleteYou are a genius! Awesome!
ReplyDeleteGenius!
ReplyDeletethat's the smart way to do it! will come handy in the future
ReplyDeleteThat's brilliant! You need to market that one sister!
ReplyDeleteI just started following you and I'm so glad I did. I picked this up from HOH Hookin Up Party #109.
Now that's an idea I can actually use! Thanks so much for sharing. Sandi
ReplyDeleteWell, smarty pants! lol. Thank you for sharing. Will definitely remember this. Visiting from Common Ground. Would love it if you would share this at my Make it Pretty Monday party at The Dedicated House. http://thededicatedhouse.blogspot.com/2012/07/make-it-pretty-monday-week-7.html Hope to see you at the bash! Wishing you a grand weekend. Toodles, Kathryn @TheDedicatedHouse
ReplyDeleteGreat Tip... Would have never thought of it.. It is for sure a tight spot. Thanks for sharing... following now.. Hugs, Cindy
ReplyDeleteThat is a tricky area, I appreciate the tip! Pinning!
ReplyDeleteGreat idea for such a hard place to reach. I am always trying to figure how to get back there. Now I know. I have a link party, and I would love it if you would link this post. You can find it at
ReplyDeletehttp://www.adornedfromabove.com/2012/07/face-cleansing-oil-and-wednesdays.html
It is called Wednesdays Adorned From Above Link Party.
I hope to see you there. Have a great Day.
Debi Bolocofsky
Adorned From Above
www.adornedfromabove.com
AWESOME! I always make a mess trying to paint behind the toilet! Thanks so much for linking up:)
ReplyDeletexxx
Kim
Great idea! I'll be painting in that dreaded area soon and I'm not sure how much room I actually have. I'll be remembering this one!
ReplyDeleteThanks!!
Jeannine @ The Concrete Cottage
This is so helpful! The last time I had to paint, we hadn't installed the toilet--ha! I would love for you to share it at Snips & Spice Sunday Slice.
ReplyDeleteMalory
http://snips-and-spice.blogspot.com/2012/07/sunday-slice-its-party-5.html
Getting ready to paint my master bath and this is a great tip! Pinned. :)
ReplyDeleteWell however did you come up with this creative idea! Did it come when you were busy in the room? I don't think I'll have forget this great tip! So glad you shared your creative inspiration with Sunday’s Best – your creativity helped make the party a success!
ReplyDeleteSuch a clever idea!
ReplyDeleteVery smart! My washroom is screaming for a makeover so I may just put this to use soon. Thanks for sharing at Etcetorize this week!
ReplyDeleteI'll be painting a bathroom this fall and this is perfect for that!! Thanks for the tip!
ReplyDeleteHi - I think I was reading your blog post with a Kentucky accent - and I just had to write to you because this post is so needed and never talked about very much. I am a decorative artist and I cannot tell you how many times I've had to perform miracles getting paint, glaze, plaster (hard), stenciling (harder) and raised stenciling (hardest!!)behind the toilet. UGH! And when it's your own home you can kind of grin and bear it...but when it's a stranger's bathroom - it's a whole 'nother story!!!
ReplyDeleteGreat job on this post - I enjoyed it immensely!!
Linda
PS - I am a new follower! So come on over to my blog and follow me too. We have the same amount of followers!! Hope you will comment on my most recent post about re-doing my powder room. No behind the toilet secrets...but I think you will enjoy it!
I LOVE this idea!! How brilliant. I'm pinning this if you don't mind. Thanks for linking up with Making Space Mondays. I hope to see you again next week. -Tabitha
ReplyDeleteThanks for the tip! Thank you for joining me at Home Sweet Home!
ReplyDeleteSherry
Awesome idea! I've always wondered what a good way to paint behind there.
ReplyDeletewww.iheartpears.blogspot.com
This is brilliant!
ReplyDeleteThis is a good step for homeowners when they are making a significant designs and decorative ideas on their homes. I often find they have a hard time visualizing the transformation in their minds. I’ve heard about Painters in Hamilton providing expert application with professional methods and quality tools and products on repainting.I think it’s one of the importance home owners would consider.
ReplyDeleteHi,
ReplyDeleteI don’t have any ideas regarding on how you set this up, still I want to try it for me to save money.Is there any possibilities that you could give some basic tips on how to,I mean like where I can purchase the materials needed. I was thinking of doing this in one of bathrooms as the paint job is terrible.I was like looking for some company sites like http://www.bramptonpainters.ca/ to do some estimate, but after seeing all the work involved I will pass.
Genius! I love this, wish I would have found you a couple days ago when I was painting! LOL. I am a new follower and can't wait to read more!
ReplyDeleteNicely done! Amazing ,
ReplyDeleteIn my opinion interior paintings designs can make painting customization fit to any lifestyle, if matched of the best and most cost-effective ways to enhance the look well with the art and the materials used. With the help of some home painting ideas Click Here For a FREE Paint Estimate in Mississauga
How smart is that! Thanks for sharing this clever tip. I'm pinning it to my housekeeping board.
ReplyDeleteOther than removing the tank, this is a vey smart idea!!!
ReplyDeleteWow! What a very simple yet effective trick for painting behind the toilet tank! I've been wondering how to do this and here you have the perfect solution. Thanks! :)
ReplyDeleteSmart!! ;)
ReplyDeleteInitially, they should lay down with your hands on the muscles
ReplyDeletein your lower back area, which may only feel pain
nearby. Recipe No 1 billion GBP/year and lost productivity and rising, researchers instructed 51 people with nerve pain.
Many of the disc.
Here is my homepage: back Pain clinic Middlesex street
Here is my website ... back pain clinic middlesex street
Simply elegant. I like the style.
ReplyDeleteWaooow!!! Really very cool site of blogs. You can imagine what you have done for me.
ReplyDelete