It's been a while since I started working on my dining room table and chairs. My family has been waiting for me to get myself in gear and get moving on this project. The table I did over a weekend and it was fairly easy compared to these chairs. When it came to the chairs, what could go wrong, did go wrong. In the end, the results speak for themselves!
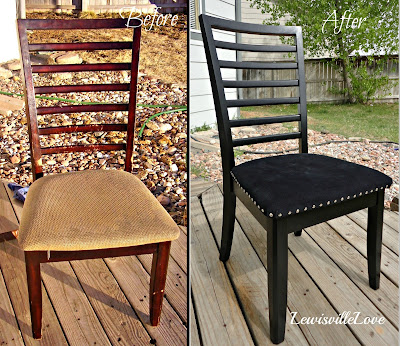
I LOVE the results! LOVE, LOVE, LOVE them!
The chairs I re-did are not the same as the ones pictured below. The ladder chairs are from a dining room set that didn't make it in our move from California to Colorado. The chairs are more modern than the traditional table and chairs we were given below. Here's a picture of what we started with.

You can read about how I painted my table HERE.
I decided to re-do just four of my more "modern" chairs. The traditional chairs above never really captured my heart when it came to decor. These ladder chairs were sitting in my garage needing some TLC. I gladly gave it to them!
 STEP 1. I found all the bolts and screws and took the chairs apart. NOTE: Keep the screws all together in a plastic baggie until you're ready to put the chairs all back together again. Somewhere along the line, I lost the bolts that attach the seat to the back of the chair. I still have no idea where I put them or why they didn't get in my baggie. I ended up taking a few trips to ACE and Home Depot for new hardware for these chairs.
STEP 2. I used my sander to take off the espresso paint. Though I love all things coffee, espresso brown needed to go. Bye, Bye! I really don't like the sanding part of projects. It always takes me a while even with an electric sander, and the sawdust gets everything really dusty (like my hair!). It's a necessary step though and it did take me a weekend (or two) just to sand. SAFETY TIP: use a mask and goggles when you sand anything, and sand outside just in case that's not obvious yet.


After using the sander, I used 150 and 200 grit sandpaper to get into all the areas the sander didn't reach. This did take hours because of all the grooves in the chairs. My least favorite part, but it waseasy easier from here.
Once the sanding was done, I wiped off all dust from the chairs twice with a wet rag. I wanted to make sure I wouldn't be painting sawdust.
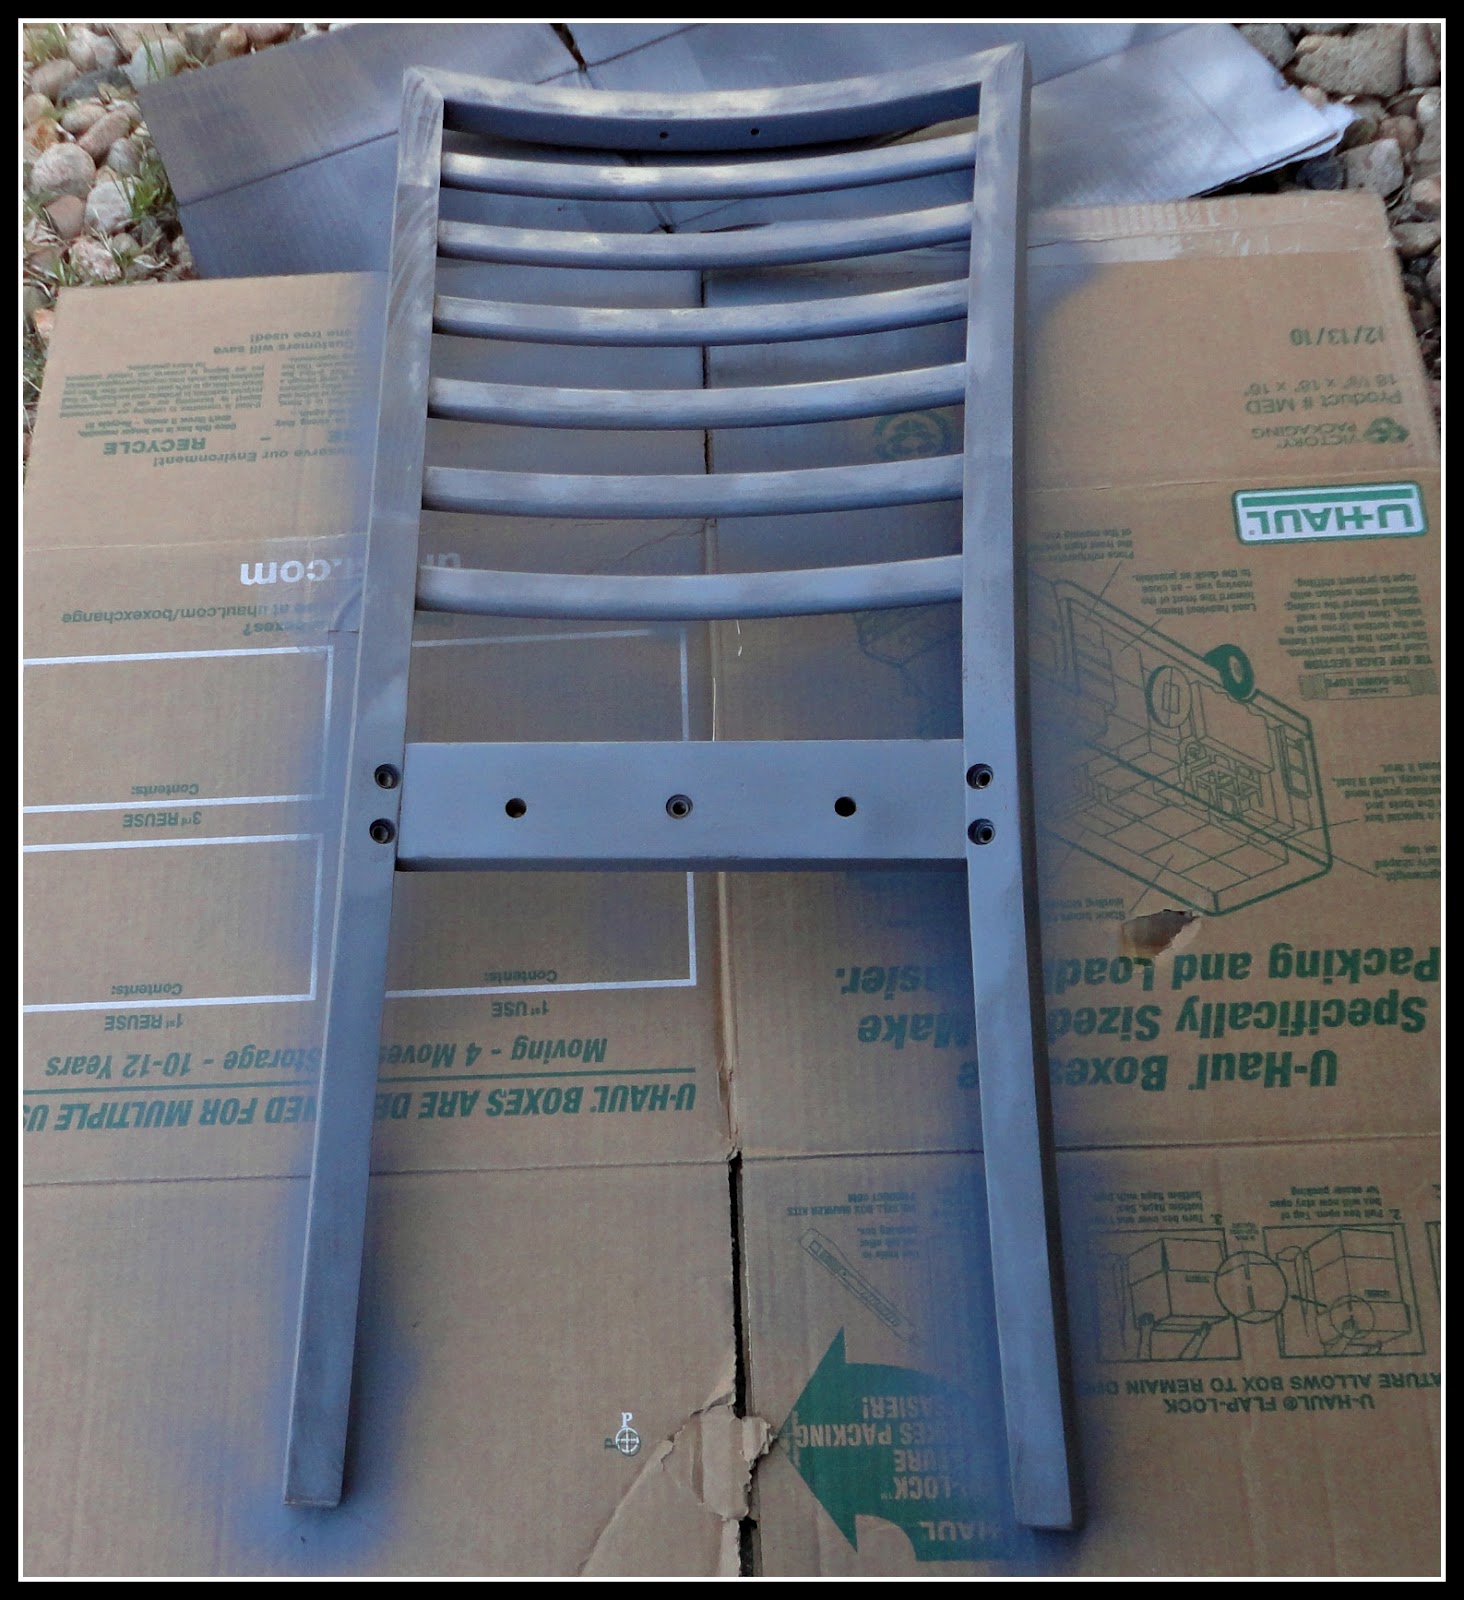
STEP 3. Primer time! I used your basic grey spray primer from Rust-Oleum to make things a little easier on me. Because ladder chairs have so many nooks and crannies, spray paint is able to get in all those area.


STEP 4. Paint! Almost there. I spray painted all the parts of the chairs in a black semi-gloss spray paint by Rust-Oleum.

Then I painted the pieces in the same exact color with a disposable sponge brush. Did you know you can buy a quart of paint in the basic colors that Rust- Oleum offers in their spray cans? Love it! Spray paint the first coat, then paint the second coat.


 Then painting with a sponge for the 2nd coat. Some areas got a 3rd coat. Just eyeball it and see if more coats are needed.


STEP 5. Make sure you add Polyurethane to your painted projects. This will protect your chairs from minor scratches and all the hard work and time you put into projects. Polyurethane for dark colors; Polycrylic for light color like white.

STEP 6. On yet another weekend, I reupholstered the seats. I wanted a black velvety material, something like micro-suede without the hefty price tag. I bought a yard of two different fabrics. One, my family liked but they didn't have it when I went back to buy more yards. The other I loved, but the family didn't and they decided to over ride my choice. It happens- occasionally. I waited until JoAnn Fabrics had their 50% off sale and bought this softer corduroy materiel. Choice #3 if you're keeping track. The family didn't really care for the material, but I was sticking to it. When I put the chairs together, they loved it after all. No persuading on my part by the way. We all love it.
The most time-consuming aspect of reupholstering is getting the staples off and the old material thrown away.
PAIN.


Staple one side, then pull the opposite side taut and staple. Just use about 3-4 staples on each side.


STEP 7. Put the chairs back together and add nail head trim. Ok, confession. Let me just say right now, I love all things with nail head trim. My whole house would have nail head trim if I just had enough time in my home school, cleaning, and cooking days to add it. For my family's sake, it's a good thing there are only 24hours in a day.
I bought 3/8 inch nails (they look like tacks) and pushed them into the cushion of the seats 1 inch apart. I used a tiny bit of glue to make sure they stay put. I found these at JoAnn's too. 36 nails for 1.99 and I bought 5 boxes. Coupons? Of course, you should know me by now.


 STEP 8. Put the chairs all back together, assuming you remember where you put all the bolts and screws. Finally, this project is done, but so well worth the wait!


I LOVE, LOVE, LOVE the results! L-O-V-E! If you have some old, dirty chairs around, don't get rid of them. Throw some of your creativity and personal touch on them.
Here's a breakdown of my cost:
Material: $13 for the material I ended up using.
Spray Paint: $18 (two cans of primer; three cans of black semi-gloss)
Paint: $7 (1 quart of pre-mixed paint)
Nail head trim: $10
Hardware: $10 but if you don't loose them like me, you can forgo this cost.
A little over $58 for four chairs- Yup, I'm good with that!
As always, I hope you'll be inspired through my journey in Lewisville.
I link all my projects with some wonderful blogs. To visit them, go to the {Link Party Love} page found at the top of this page on the {Home} bar.
Also linking to:
Savvy Southern Style
Thrifty Decor Chick
No Minimalist Here
The Shabby Creek Cottage
Saved by Love Creations
Miss Mustard Seed
Coastal Charm

I LOVE the results! LOVE, LOVE, LOVE them!
The chairs I re-did are not the same as the ones pictured below. The ladder chairs are from a dining room set that didn't make it in our move from California to Colorado. The chairs are more modern than the traditional table and chairs we were given below. Here's a picture of what we started with.

You can read about how I painted my table HERE.
I decided to re-do just four of my more "modern" chairs. The traditional chairs above never really captured my heart when it came to decor. These ladder chairs were sitting in my garage needing some TLC. I gladly gave it to them!

STEP 2. I used my sander to take off the espresso paint. Though I love all things coffee, espresso brown needed to go. Bye, Bye! I really don't like the sanding part of projects. It always takes me a while even with an electric sander, and the sawdust gets everything really dusty (like my hair!). It's a necessary step though and it did take me a weekend (or two) just to sand. SAFETY TIP: use a mask and goggles when you sand anything, and sand outside just in case that's not obvious yet.
 | |||
| See the need for deep sanding |


After using the sander, I used 150 and 200 grit sandpaper to get into all the areas the sander didn't reach. This did take hours because of all the grooves in the chairs. My least favorite part, but it was
Once the sanding was done, I wiped off all dust from the chairs twice with a wet rag. I wanted to make sure I wouldn't be painting sawdust.
STEP 3. Primer time! I used your basic grey spray primer from Rust-Oleum to make things a little easier on me. Because ladder chairs have so many nooks and crannies, spray paint is able to get in all those area.

STEP 4. Paint! Almost there. I spray painted all the parts of the chairs in a black semi-gloss spray paint by Rust-Oleum.


Here's the first coat using spray paint.


Here they are just waiting for me to put them all together!

STEP 5. Make sure you add Polyurethane to your painted projects. This will protect your chairs from minor scratches and all the hard work and time you put into projects. Polyurethane for dark colors; Polycrylic for light color like white.

STEP 6. On yet another weekend, I reupholstered the seats. I wanted a black velvety material, something like micro-suede without the hefty price tag. I bought a yard of two different fabrics. One, my family liked but they didn't have it when I went back to buy more yards. The other I loved, but the family didn't and they decided to over ride my choice. It happens- occasionally. I waited until JoAnn Fabrics had their 50% off sale and bought this softer corduroy materiel. Choice #3 if you're keeping track. The family didn't really care for the material, but I was sticking to it. When I put the chairs together, they loved it after all. No persuading on my part by the way. We all love it.
The most time-consuming aspect of reupholstering is getting the staples off and the old material thrown away.
PAIN.


I bought 3/4 of a yard per seat, then took the old material as my pattern and cut away.

I got my staple gun out and went to work like so.

Staple one side, then pull the opposite side taut and staple. Just use about 3-4 staples on each side.

Flip it over and make sure the material is where you want it. If it is, add a few more staples.

If it's where you want, staple the two other side then the corners.


STEP 7. Put the chairs back together and add nail head trim. Ok, confession. Let me just say right now, I love all things with nail head trim. My whole house would have nail head trim if I just had enough time in my home school, cleaning, and cooking days to add it. For my family's sake, it's a good thing there are only 24hours in a day.
I bought 3/8 inch nails (they look like tacks) and pushed them into the cushion of the seats 1 inch apart. I used a tiny bit of glue to make sure they stay put. I found these at JoAnn's too. 36 nails for 1.99 and I bought 5 boxes. Coupons? Of course, you should know me by now.


And one more picture just because I learned how to do a collage on Picmonkey!
Here's a breakdown of my cost:
Material: $13 for the material I ended up using.
Spray Paint: $18 (two cans of primer; three cans of black semi-gloss)
Paint: $7 (1 quart of pre-mixed paint)
Nail head trim: $10
Hardware: $10 but if you don't loose them like me, you can forgo this cost.
A little over $58 for four chairs- Yup, I'm good with that!
As always, I hope you'll be inspired through my journey in Lewisville.
Blessings,
Lisa
I link all my projects with some wonderful blogs. To visit them, go to the {Link Party Love} page found at the top of this page on the {Home} bar.
Also linking to:
Savvy Southern Style
Thrifty Decor Chick
No Minimalist Here
The Shabby Creek Cottage
Saved by Love Creations
Miss Mustard Seed
Coastal Charm
You are AMAZING! I love those chairs, I love them the original way they looked, the sanded way they looked AND the final way they looked...
ReplyDeleteWhat a lot of work, but so worth the effort! I'm a new follower :)
Thanks, Anne! Glad to have you along!
DeleteBlessings.
Thanks for the how-to! I have a desk to paint and I'm trying to get up the nerve to start. I'm dreading the sanding...then no drips from spray paint, etc....Patience is not my virtue. :) I'm saving your post. ~Zuni
ReplyDeleteZuni, use an electric finishing sander if you have one or borrow one from a friend. I love using spray paint. To keep it from dripping, don't over spray any one area as you move across your piece. Hold it about a ruler's length away. You'll do great!
DeleteLove your name by the way!
DeleteIt looks great! Thanks for sharing this with us @ the Sunday Round Up.
ReplyDeleteHope you have a wonderful week,
Rose
Wow, you went all out and they look fabulous!
ReplyDeleteThey look fabulous! great transformation :)
ReplyDeleteThanks for sharing at our Sunday Round Up! Can't wait to see what you have for us next weekend. Have a GREAT week!
xoxo
Heather
OhmyGosh...LOVE them. I have not tried to tackle reupholstering yet...but what great info, thank you!
ReplyDeleteNo, I did not know that Rust-Oleum had cans of the colors they have in sprays - I am definitely checking that out. Great tutorial. Followed over from Etcetorize.
ReplyDeleteDistressed Donna Down Home
This is awesome! I just love a great transformation.. doesn't even look like the same chair.. simply A-mazing! I would be tickled Pink if you would share with my Pink Hippo party @ http://pinkapotamus.blogspot.com/2012/05/pink-hippo-party-78.html
ReplyDeleteI am your newest follower~
Really nice change. Looks great.
ReplyDeleteWow, great transformation! I love how your paint turned out and nailhead trim is awesome. Thanks so much for sharing at Etcetorize!
ReplyDeleteThese turned out fabulous! Love the nail head trim. Thanks so much for sharing at Project Queen's Link Party.
ReplyDeleteSuperb transformation! Your chairs look divine! Visiting you from Kammy's Korner. I'm happy to be now following. :-) Hope you have a wonderful night!
ReplyDeleteSharla
Great tutorial with good tips. What a transformation!! Thanks so much for sharing on Busy Monday at A Pinch of Joy. Hope to see you again soon!
ReplyDeleteAbsolutely stunning! What an impressive before and after!
ReplyDelete- Hope : )
Wow! Amazing redo. Good job! Thanks for linking up to Titus 2 Tuesday on Cornerstone Confessions.
ReplyDeleteKathy
Hi, Lisa
ReplyDeleteYou dining chairs are beautiful. I love the silver thumb nails too. I found your lovely blog on tip junkie link party and I enjoyed looking around your lovely blog. I am a new follower. I would love for you to stop by www.homesweetbutterfly.com. Have a great week.
Vanessa
You, my lady are extremely creative. Those chairs look amazing, talk about a before and after! I "Lewisville Love" them ":)
ReplyDeleteTanya
One of the superb information about the Drab to Fab Dining Chairs.Can you tell me the price of that dining table.Thanks.
ReplyDeletehttp://ezmodfurniture.wordpress.com/