A few weeks ago I bought a dresser at a local Goodwill store. I popped in just to see if they had anything for under $25 that I could paint and sell for later. I was looking for the perfect furniture flip. Buy a piece, make it better, and flip it- you know like people do with houses but with less time, stress, and money. It's not something I usually do, but I've painted enough furniture that I thought it was high time to make a little extra for my efforts. Plus I've been inspired by so many other DIYers out there who do the same. I did in fact find the perfect little oak dresser for only $20! I couldn't believe it! Here is what she looked like before.
 She went right into the garage when I got her home. It was a very exciting moment for me, though my family couldn't understand my enthusiasm for such a dilapidated dresser. She graduated from the garage to the house when the weather finally cooperated for a few short days. I was able to take her to the back yard patio and work on her.
So here is her BEFORE......

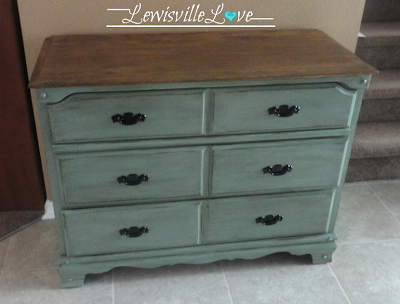
And here is her AFTER.....


What do you guys think? Will she flip? There was obviously some work that went into this dresser, and I have lots of pictures for those of you who are like me and need a visual of each step. So beware of the rest of this post. It's long and loaded with lots of pictures. For the most part, the pics speak for themselves and I'll just chime in here and there...maybe.
I think she was so cheap because of the damage on the top. Whenever I'm looking for a piece either for my home or to flip, I look for real wood furniture. With real wood, you can sand it down and make it all nice and shiny again. I saw the potential in this piece, so if you're thinking about thrift store buying, look beyond the scratches.
I used Elmer's wood filler to smooth out the deep grooves. Apply liberally and let it dry completely before sanding.

The dresser also came with this lovely drawer lining. I pulled it up to allow the natural beauty of the wood to be seen in the drawers. They were perfect!

There was gum and goo all over the dresser. She got a good cleaning.

Look at the tongue and grooves on the drawers. Another something I always look for in furniture.

So once it warmed up a little, Colorado apparently doesn't know it's supposed to be spring, I took everything outside and sanded her down. You can use just sand paper for this step, but I prefer my electric sander to make this step go quickly. The top was sanded down to the bare wood. Everything else was sanded down just to get the shine off and the orangy color to disappear. Sometimes I do go a little overboard when I'm using my all powerful sander. You don't have to sand down to the bear wood- unless you're going to stain the whole piece- then sand away.

When I was sanding, I noticed one of the legs was damaged. Oops, didn't see that in the store.

This is what that leg is supposed to look like.

I had some molding in my garage and decided it was good enough/ close enough to the other leg to repair this damaged end. I cut it down using my new favorite tool from Christmas. Yeah for hand tools that ladies can use! I used wood glue to add the molding to the bottom.

Here she is all sanded, ready to be painted and spruced up again.

Doesn't that top look so much better?

I LOVED the way the top of the dresser turned out after sanding it, so I decided to stain it in Walnut by Minwax. It popped immediately. Looking good, girl!
The rest of the dresser got 2 coats of white primer. This is the primer I always use. Always!
 She looks good already, doesn't she? I love this two tone effect with naturally stained wood and paint, but I didn't want it looking too country. I decided not to paint her white.

Then I noticed she was missing some of her "plugs". I didn't know that's what they were called until I went to Home Depot and showed them this little piece of wood I was really hoping they might carry somewhere in their warehouse. "Oh, ya," the friendly associate said. "We have plugs". I learned something new- furniture plugs! It's that little round piece of wood that covers nails and screws. I was just glad I wouldn't have to whittle down a piece of wood!

Now it was time to decide on a color. It took me a week to figure this out. I wanted to do a Tiffany blue or some rich turquoise color. Remember, I'm all gaga for turquoise right now. I had a quart of turquoise I picked up for free at Ace Hardware a few weeks ago, but it was much brighter than I remembered. Not pretty. Not going to work. I had another free quart of paint, also from Ace Hardware, I picked up on another free paint weekend that turned out to be the perfect color for this project. It's a Benjamin Moor color called Grenadier Pond.

Everything from the wood stain down got two coats.

Yes, I painted inside. It was snowing....again (ugh!). The paint is a flat enamel, and I had the garage door open and my back sliding glass door open. I had a good cross wind, trust me.

You want to hear something funny? Of course, you do! Later I checked to see the name of the paint color so I could let all my lovely readers know the name just in case they were interested. When I did that, I discovered the paint was a "paint and primer" all in one step! I didn't have to prime this piece! Two days, two coats, too funny. I'm crying on the inside. Tear, wipe, moving on....

I liked the color, but it really needed something more. I decided to shab the furniture lines. Ironically, I don't usually like shabby chic, but this dresser was just calling for it. I used a sanding block to sand down the furniture lines only, not the whole thing.

I also decided to use glaze- my first time ever using glaze by the way- SO NERVOUS!

Glaze is whole post on its own to explain, but in a nut shell, I bought pre-tinted glaze from Lowes. They're the only store I know of that sells pre-tinted glaze. This pre-tinted bottle of antiquing glaze goes on just like paint. I used a sponge brush to "paint" it on, and it does looks like you're painting on black paint. That's the scary part. Once the glaze is on for a few minutes, you take a hot cloth and wipe off the excess.

In the meantime, I also spray painted the original handles. I thought about buying new ones, but the size of these was difficult to find. Spray paint it is then!

Perfect.
 Finally, She got two coats of wipe on polyurethane, sanding with 600 grit sand paper in between coats on the wood top.

I think she will make a lovely entry way table/dresser.


 What do you think?


Is she shabby enough? Chic enough? But more importantly, will she flip and for how much?
Hope you found some inspiration from this really, really long post!
UPDATE: So we ended up keeping the dresser for 2 years. For two years she served us well and all who saw it showered compliments of how great it looked. I did end up selling it for $250 and had several people in line to buy. On to the next dresser!

So here is her BEFORE......

And here is her AFTER.....


I think she was so cheap because of the damage on the top. Whenever I'm looking for a piece either for my home or to flip, I look for real wood furniture. With real wood, you can sand it down and make it all nice and shiny again. I saw the potential in this piece, so if you're thinking about thrift store buying, look beyond the scratches.
I used Elmer's wood filler to smooth out the deep grooves. Apply liberally and let it dry completely before sanding.

The dresser also came with this lovely drawer lining. I pulled it up to allow the natural beauty of the wood to be seen in the drawers. They were perfect!

There was gum and goo all over the dresser. She got a good cleaning.

Look at the tongue and grooves on the drawers. Another something I always look for in furniture.


When I was sanding, I noticed one of the legs was damaged. Oops, didn't see that in the store.

This is what that leg is supposed to look like.

I had some molding in my garage and decided it was good enough/ close enough to the other leg to repair this damaged end. I cut it down using my new favorite tool from Christmas. Yeah for hand tools that ladies can use! I used wood glue to add the molding to the bottom.

Here she is all sanded, ready to be painted and spruced up again.

Doesn't that top look so much better?

I LOVED the way the top of the dresser turned out after sanding it, so I decided to stain it in Walnut by Minwax. It popped immediately. Looking good, girl!
The rest of the dresser got 2 coats of white primer. This is the primer I always use. Always!


Then I noticed she was missing some of her "plugs". I didn't know that's what they were called until I went to Home Depot and showed them this little piece of wood I was really hoping they might carry somewhere in their warehouse. "Oh, ya," the friendly associate said. "We have plugs". I learned something new- furniture plugs! It's that little round piece of wood that covers nails and screws. I was just glad I wouldn't have to whittle down a piece of wood!

Now it was time to decide on a color. It took me a week to figure this out. I wanted to do a Tiffany blue or some rich turquoise color. Remember, I'm all gaga for turquoise right now. I had a quart of turquoise I picked up for free at Ace Hardware a few weeks ago, but it was much brighter than I remembered. Not pretty. Not going to work. I had another free quart of paint, also from Ace Hardware, I picked up on another free paint weekend that turned out to be the perfect color for this project. It's a Benjamin Moor color called Grenadier Pond.

Everything from the wood stain down got two coats.

Yes, I painted inside. It was snowing....again (ugh!). The paint is a flat enamel, and I had the garage door open and my back sliding glass door open. I had a good cross wind, trust me.

You want to hear something funny? Of course, you do! Later I checked to see the name of the paint color so I could let all my lovely readers know the name just in case they were interested. When I did that, I discovered the paint was a "paint and primer" all in one step! I didn't have to prime this piece! Two days, two coats, too funny. I'm crying on the inside. Tear, wipe, moving on....

I liked the color, but it really needed something more. I decided to shab the furniture lines. Ironically, I don't usually like shabby chic, but this dresser was just calling for it. I used a sanding block to sand down the furniture lines only, not the whole thing.

I also decided to use glaze- my first time ever using glaze by the way- SO NERVOUS!

Glaze is whole post on its own to explain, but in a nut shell, I bought pre-tinted glaze from Lowes. They're the only store I know of that sells pre-tinted glaze. This pre-tinted bottle of antiquing glaze goes on just like paint. I used a sponge brush to "paint" it on, and it does looks like you're painting on black paint. That's the scary part. Once the glaze is on for a few minutes, you take a hot cloth and wipe off the excess.

In the meantime, I also spray painted the original handles. I thought about buying new ones, but the size of these was difficult to find. Spray paint it is then!

Perfect.


I think she will make a lovely entry way table/dresser.


Is she shabby enough? Chic enough? But more importantly, will she flip and for how much?
Hope you found some inspiration from this really, really long post!
UPDATE: So we ended up keeping the dresser for 2 years. For two years she served us well and all who saw it showered compliments of how great it looked. I did end up selling it for $250 and had several people in line to buy. On to the next dresser!
Blessings,
Lisa
I link all my projects with some wonderful blogs. To visit them, go to
the {Link Party Love} page found at the top of this page on the {Home}
bar.
Also linking to:
Between Naps on the Porch
Savvy Southern Style
No Minimalist Here
The Shabby Creek Cottage
Miss Mustard Seed
Funky Junk Interiors
Coastal Charm
Also linking to:
Between Naps on the Porch
Savvy Southern Style
No Minimalist Here
The Shabby Creek Cottage
Miss Mustard Seed
Funky Junk Interiors
Coastal Charm
What a great dresser and I don't know why she wouldn't flip, she is gorgeous!
ReplyDeleteThanks you!
DeleteI really like the finished product...would love to try this with the glazed finish
DeleteI just found your blog and love it! I love this piece! The color is fantastic. I am going to pin this on pinterest to remember the color-it's great. thanks for sharing!
ReplyDeleteThanks, Aubrey and thanks for pinning it.
DeleteI learned a lot from this post! Thanks!
ReplyDeleteBobi
bobijensen.com
I hope it all made sense???
DeleteWhat an improvement! Id ask a minimum of $50 for it
ReplyDeleteI guess you never spent DAYS working on a piece of furniture! $50 wouldn't quite do it! I say $200! I love it!
DeleteAngie
Your dresser is so nice, I love the colors and leaving the top wood. I've seen that so much lately and love it. Love the stain color you used, makes it look so rich. You did such a good job rehabilitating the top, it was in such bad shape.
ReplyDeleteI've been redoing a nightstand/end table and almost left the top wood. Kinda wish I had now but I'm practicing on my own pieces before I try a piece I'm going to sell.
I've got to write down the colors and print out the whole process of your dresser or I'll forget. I print out everything and have notebooks with projects so I can refer to them when I want to do a project. You'll understand when you're 72, your instant recall, there isn't one. I can remember conversations from years ago but don't ask me what we had for supper. Sigh, such fun getting old.
It's snowing like crazy in Grand Junction. They just showed it on the news. This has been some crazy "Spring?". It's my fault actually, I got out some summer clothes last week. If this nonsense keeps up I'm moving back to Tucson.
I used to get your blog when I was on another provider, missed your blog but finally found you on a blog hop or something like that. Good luck selling that adorable dresser. It would make a very nice entry chest, (if you have an entry that is, you just burst right into the living room at our house). I miss our house in KY so much too many times. I didn't like it there due to climate but I loved our place. Happy Days
Sometimes I stain the wood, sometimes I just paint. When you redo lots of pieces, you'll go back and forth. Enjoy the process.
DeleteBlessings,
Lisa
Looks great!! I'm curious as to how much it sells for. $50 sounds low to me, but I don't really know what refinished furniture goes for.
ReplyDeleteLooks good to me..now can you part with it??? that is my problem...I like so well I want to keep my treasures...
ReplyDeleteI know! I'm liking it more and more each day! If it doesn't sell for what I want for it, I get to keep it! It's a win-win for me!
DeleteLisa, that dresser is fabulous! You did a pro job with it. It should flip fast. If I were buying it, I'd be willing to pay at least $150. Love your blog so much. And when I hear it's snowing again in Colorado, I always think, "But Lisa is ready for Spring!"
ReplyDeleteThanks, Sharon! And, yes, I'm ready for Spring. Spring means more projects.
DeleteIt looks awesome! Great job on the transformation! :) I'm visiting from Tater Tots and Jello! Hope you'll come visit sometime! Have a great weekend!
ReplyDelete-Bonnie @ Revolutionaries
www.revolutionariesblog.com
Lisa,
ReplyDeleteI think it will "flip" for sure! What a fabulous difference. I too, am always on the look-out for all wood furniture, very hard to come by.
I just finished redoing an all wood dresser this week too and also used Antiquing glaze, come by for a visit when you can to see it.
Visiting you from Funky Junk party.
It looks beautiful, well done!
ReplyDeleteI would love to have you come and share! Come join the link party @ Share it With Us Saturdays on Great Tastes Tuesdays! The party starts Friday @ 8:30 p.m. Mountain time and runs all weekend. Don’t miss out! I would love to have you! http://greatastestuesdays.blogspot.com/2013/04/document.html
ReplyDeleteFab!!!I love it. It looks awesome.
ReplyDeleteLisa, it's fabulous! May I invite you to come link it up at our party at http://www.finecraftguild.com/party-63/ ?!I would love to see your beautiful creations there!
ReplyDeleteGreat re-do! You literally gave this chest a new life. Thanks for sharing all of your furniture painting tips. I hope you make LOTS of money on this piece..you certainly deserve it after all that work. I saw your post over at "Sunday Showcase".
ReplyDeleteYou did a great job Lisa! The dresser came out beautiful and the color is awesome with the stained top!
ReplyDeleteProblem is now you won't be able to stop painting everything in sight!
Susan
Good Afternoon Lisa, What a fabulous tutorial. I have a dresser made of pine....I know, I know, not very nice, but the bones of the piece are very good. I want to do exactly what you have done so I was thrilled to find your tutorial.
ReplyDeleteThis will be my first paint project in many years (I painted everything white in the 60's and early 70's!) so I am excited to start....I just have to wait for the weather to improve. I am so pleased to find you that I have become a new follower.
I would like to invite you to visit me at Ivy, Phyllis and Me! you will always be welcome.
Best Wishes from England.
Daphne
When I saw this dresser it really caught my attention. Your oak dresser was sold by Sears in the 1960's. It was part of a "bedroom set" that my husband and I bought when we were first married and students at the University of Georgia. We kept the furniture for several years but eventually sold it for a king size bed. It was well made, made in America furniture.
ReplyDeleteYou've given it new life and brought it into a newer time.
You did a fantastic job! I love this color. I’d love it if you could link this up to our party, Give Me The Goods Monday! {1 party, 5 blogs}
ReplyDeletehttp://www.somuchbetterwithage.com/2013/04/give-me-goods-party-5.html
Have a great week!
Jamie @ somuchbetterwithage.com
You did a beautiful job with the dresser. Love the color! I have a new weekly link party which is live now and I would love if you stop by and link up this wonderful post! Hope to see you there! http://mariaelenasdecor.blogspot.com/ Hugs, Maria
ReplyDeleteIt looks beautiful! I'm going to pin to follow your instructions later!
ReplyDeleteI agree with you.....solid wood is the best buy and tongue and groove drawers are an extra bonus. A great find and you really made it look pretty. A lovely piece with many possible placements in the home.
ReplyDeleteReuzeit Emporium Blog
Reuzeit Emporium
I think it's lovely and $150 would probably just be a break even point if you consider all your time!
ReplyDeleteI personally love the shabby chic look. Your dresser looks amazing! I love the color and you should really be able to get a lot of money out it. Great job with the glazing! Visiting from the Wow us Wednesday link party. Have a wonderful day! ~ Jamie
ReplyDeleteLooks great!! It's amazing how much a make-over can do for a plain peice of furniture. Truly pretty. -Tabitha
ReplyDeleteLovely! And I like that you kept the top wood - I think that really adds even more charm and character. Venturing into the world of waxes and glazes myself these days. Uncharted territory!!
ReplyDeleteLooks great. Wonderful color choices. I am such a sucker for dressers. So versatile!
ReplyDeleteBeautiful , love the natural wood top. Thanks for sharing!
ReplyDeletegood job! love the paint color. Little Bit
ReplyDeleteVery pretty! I love the color!
ReplyDeleteLooks great! What a transformation. Paint does wonders...I just finished a couple projects myself...Following from Hickorytrailblog.blogspot.com
ReplyDeleteI learned so much from this post Linda. And, we are re-doing our master bedroom, and will be needing a new dresser...I never thought of going to the thrift store to look for one, but you have inspired me to do just that!
ReplyDeleteI think your dresser looks just lovely as an entryway piece. I vote you keep it!
Thanks for the helpful post!
Betty (Maddiebellahome.blogspot.com)
Great job. I love the color.
ReplyDeleteGORGEOUS!! Found you through Coake Family - Family Fun #11...
ReplyDeleteCher @ Designs by Studio C
http://designsbystudioc.com
Hi, I love it and think you did an awesome job. I'm not sure about the price. Maybe $150.00-$175.00? Good luck...Connie
ReplyDeleteGREAT work! LOVE the color!
ReplyDeleteI think the glazing looks awesome. I'm inspired to give it a shot on my own now!
ReplyDeleteVery pretty ~ I have a goodwill dresser I might have to do in this color, too! Love it!
ReplyDeleteI'm visiting you today from By Stephanie Lynn. I hope you get a chance to stop by my blog and leave a comment, too!
~ Megin of VMG206
Tile Photo Coasters ~ Gift Idea
Lisa, it's beautiful! I love the color and the primer you use is the one I swear by! I have the glaze and need to try it as I am inspired by your piece. I think your pretty dresser will sell in no time! Good luck. Found you at the Dedicated House Make it Pretty Monday. Now following you!
ReplyDeleteI love furniture makeovers and this one is beautiful. Great job on the coloring. Don't see a problem selling this.
ReplyDeleteYeah...our Colorado weather has NOT been cooperating this year. :(
Kelly
I think it's great sounds like a lot of work though but if you can flip it go for it good luck!!!!!
ReplyDeletehttp://myadventureswithmy2kids.blogspot.com/
I think it looks A-Mazing! You did such a great job!
ReplyDeleteThanks so much for linking up at the Real Family Fun link party! Hope to see you next week.
KC
You transformed that dresser. It has a new life.
ReplyDeletePlease forgive an old school teacher, but it's bare wood, not bear wood, like the animal.
Oh my goodness. I usually catch those things. Thanks :)
DeleteLooks great! I love the colour you cose too!
ReplyDeleteKrista @thehappyhousie
Oops that was supposed to say "chose"
ReplyDeleteAwesome! Funnily enough, I ALSO grabbed turquoise paint during the free paint weekend at Ace's a few weeks ago! I bought mine for a dresser and night stand I am redoing right now--my first try EVER! It's very bright turquoise, but I'm going to use dark wax with it and it will be going into our guest room which has yellow walls so I think it'll look good. I hope. Yikes!
ReplyDeleteGreat job!
I LOVE this! You did a wonderful job! Thanks for sharing at Give Me the Goods! Can't wait to see what you bring to the party next week! Don't forget to stop by tomorrow and checkout our features!
ReplyDelete~chelsea @ http://www.marriedfiling-jointly.com
You did AWESOME!! It looks outstanding, Lisa!
ReplyDeleteShe's definitely shabby-chic! Good job! I have a cabinet that's waiting for make-over, but I haven't started yet because ... one of the legs is damaged :-). Feel free to join my link party with this project: Crafty Country Cottage @ Old Red Barn.
ReplyDeleteGoedele
It's gorgeous! You will be one of the features at the Make it Pretty Monday party at The Dedicated House! Pop on in and grab a feature button for your blog. Hope to see your prettiness again at the bash! Toodles, Kathryn @TheDedicatedHouse
ReplyDeleteGreat job! I'm featuring your dresser in the Power of Paint Party Spotlight this week. Thanks for linking up.
ReplyDeleteGreat transformation! I love the color and I honestly didn't know about Valspar glaze. I'll be heading to Lowe's tomorrow. :)
ReplyDeleteI just found you through the PoPP and now a new follower. I would love for you to visit me at http://stonecreekantiques.blogspot.com/!
What a fantastic makeover! Thanks so much for sharing at Simple & Sweet Fridays!
ReplyDeleteJody
I'd like to invite you to my Friday Flash Blog, where you can share your best blog entry of the week! The party goes on ALL weekend at thejennyevolution.com. And who knows, you may just get featured next week.
ReplyDeleteJennifer
thejennyevolution.com
So... did it ever sell? :)
ReplyDeleteI've gone back and forth on keeping it. We love it (the entire family) but this last week I finally decided I would love to be debt free more, so I'm going to sell it and keep plugging away with the money! I'll keep everyone post when it does sell!
DeleteHave just encountered your page and I guess you should be complimented for this piece. More power to you!
ReplyDeleteLIsa, love the dresser, you make your Tia proud!!! Guess who
ReplyDeleteThanks Tia!
DeleteLove it!
ReplyDeleteEnjoyed your post and all the information. Did you ever end up flipping it, and if yes, for how much?
ReplyDeleteI did get put it up on craigslist for $275 and I had many responses. In the end, we decided to keep it a while longer and I'm still using it. It's one of my favorite pieces in my living room now and I'm glad we decided to keep it.
DeleteI just found your blog after searching how to paint my dresser! I love it, thanks for posting!!
ReplyDeleteI just found your blog after doing research on how to paint my dresser. I love all of your posts, thank you for sharing!
ReplyDeleteLove this re-do. Would like to learn more about the step you mention of using polyurethane. Do you have a blog post on this step?
ReplyDeleteWe just bought a newer home with the entry level oak varnish cabinets. We really want to do something like this to those cabinets, but we are very nervous for that to be our first attempt at something. Hopefully we can make something look half as nice as what you just did.
ReplyDelete